World of Tanks basic explanation for starters [ENG]
Let’s start from the beginning.
All tanks have a base stat that you can achieve with a 100% crew (the commander is 100%, and the rest of the crew goes up to 110%). If this is the case, then your reload time, camo rating, vision range is the base amount that is specific to the tank and depends on the modules that are put on the tank. (better turret = better viewrange, better engine = faster acceleration/top speed) These base stats can be boosted by fitting extra equipment to the tank (such as gun rammer = faster reload, coated optics = better viewrange, ventillation = +5% on the crew skills). You can also train specific skills after you’ve reached 100% (and 110%). At first, you should go for Sixth sense for the commander, and if you’re not playing a light tank, go for repairs for rest of the crew. The light tanks have to go for sixth sense + camouflage on the rest of the crew. For second skill, go for brothers in arms.
The spotting mechanism:
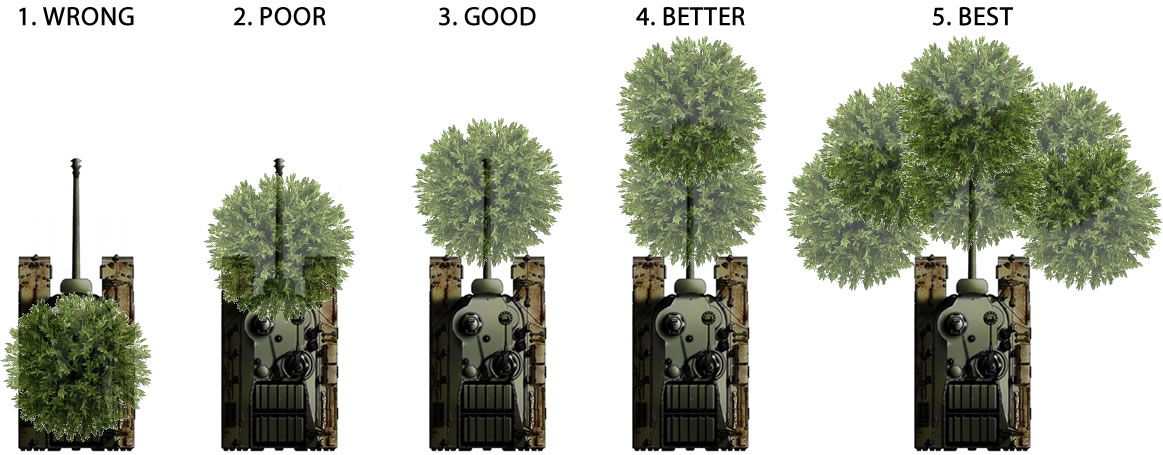
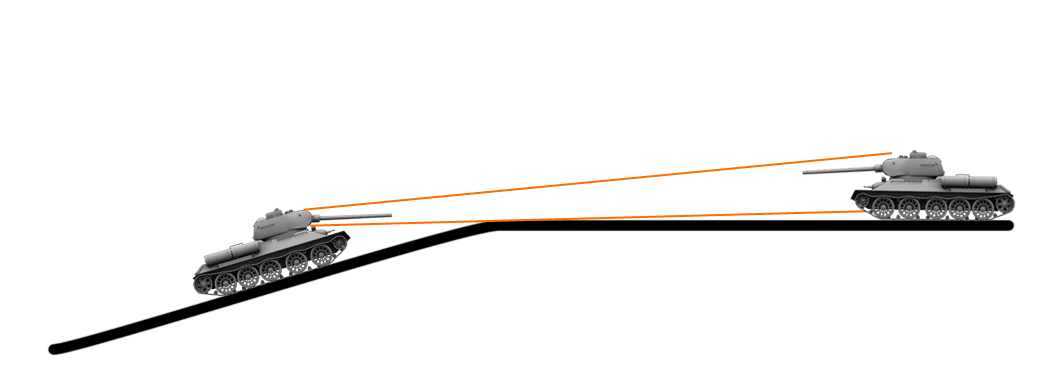
Tanks have a base camo value. If it’s large, then it’s harder for enemy tanks to spot you. Heavy tanks have very little camo rating, while mediums have small to mid, and tank destroyers and light tanks have good camo values. If a tank is on the move (not stationary), then it’s camo rating is reduced, but when it stops and waits a bit, it goes back up. If a tank fires, it’s camo rating significantly drops, so it’s easier for the enemies to spot it. There are bushes in the game, that you can hide behind, and it boosts your camo rating significantly, depending on the size of it. Be careful that you don’t expose any part of your tank from behind the bush, or the enemies will spot you. There’re two ways of kemping in da boosh (:P). One is when you’re inside the bush, and it’s transparent: in this case, you can see through it, and spot the enemies, but your camo rating is boosted. The other one is when you are staying behind the bush and you cannot see through it (so you won’t be able to spot enemy tanks in the distance), but your camo rating is boosted beyond recognition. (it’s really goot to go into the bush, spot the enemies, move backwards till you cannot see through the bush, but the enemy is still spotted, so you can shoot him without being spotted)
Important tactics:
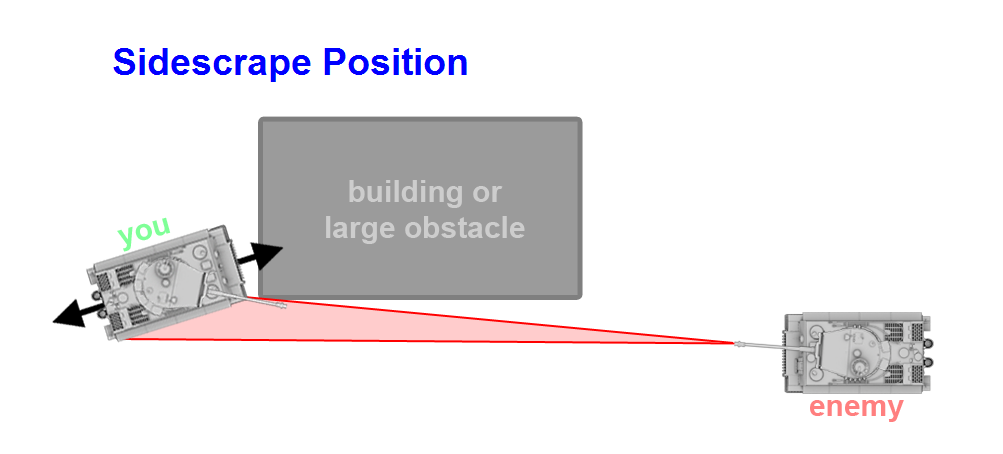
When you’re playing with a heavy tank that has good armor (for eq: IS3), always use side-scraping when near buildings. In this case, almost always drive around a corner (that you know an enemy tank is camping) that you’re only showing your side armor (that is magical spaced armor on the IS3), at a very high angle so the enemy’s bullets will auto-ricochet out of your side or will get eaten by your tracks.
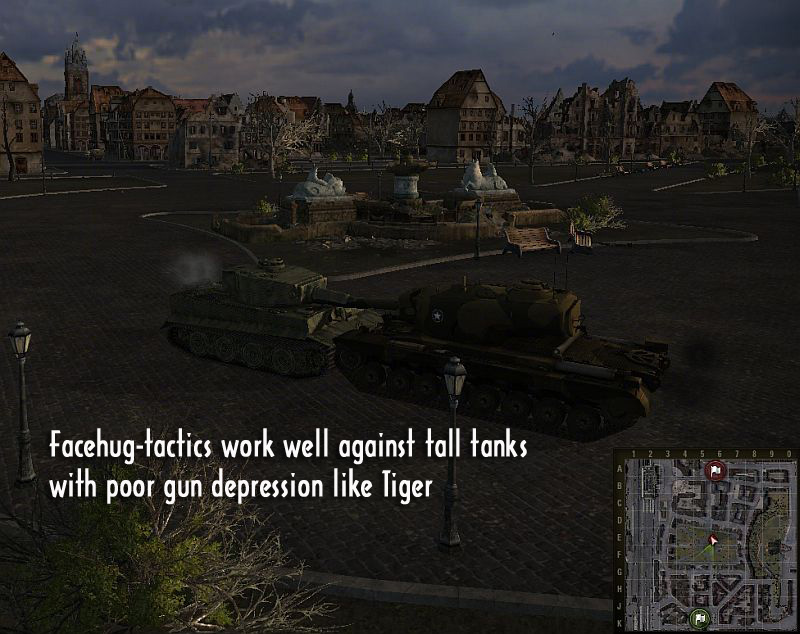
When playing with heavy tanks, face-hug your enemies (depending on the tank). In those cases the enemies can’t really point their gun at your lower plate, so they’ll have to hit your weakspots, and you can fuck up their aim by wiggling your turret (especially important with the IS3).
Where to shoot tanks.
A very useful site where you can check out the weakspots of tanks: Tanks.GG
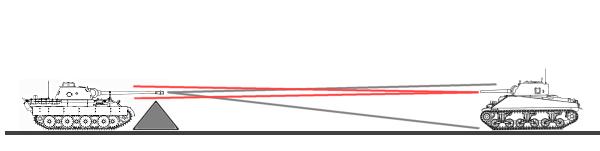
Always go for the lower-plate on enemy tanks. It’s the easiest way to pen them. If the enemy is hiding it’s lower plate (behind a pile of rubbel), try to shoot it’s weakspots (machine gun ports, commander’s cupola on the top of the turret), or if he’s not angling his tank well, then to the straight surface that’s facing you.
Always try to go hull-down (when the enemy can only see your turret), and move around so they cannot hit weakspots. Move into and out of cover (only move out of cover when you want to shoot).
How to angle your tank
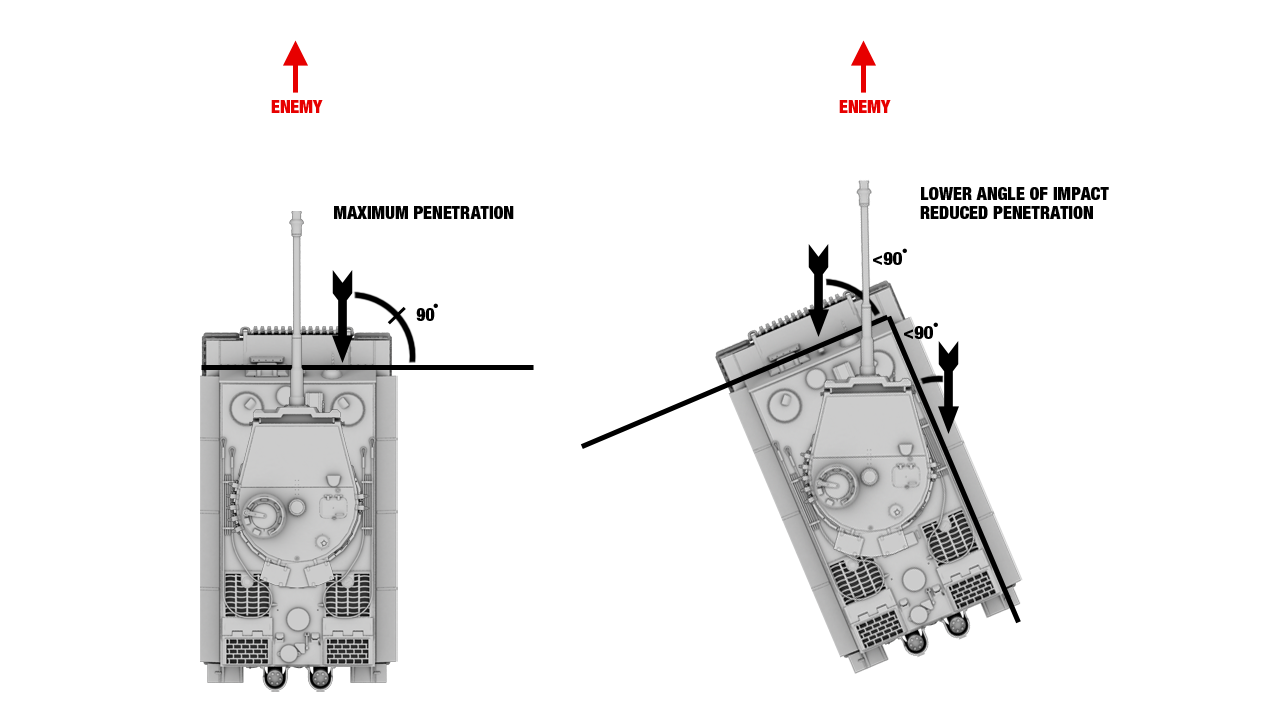
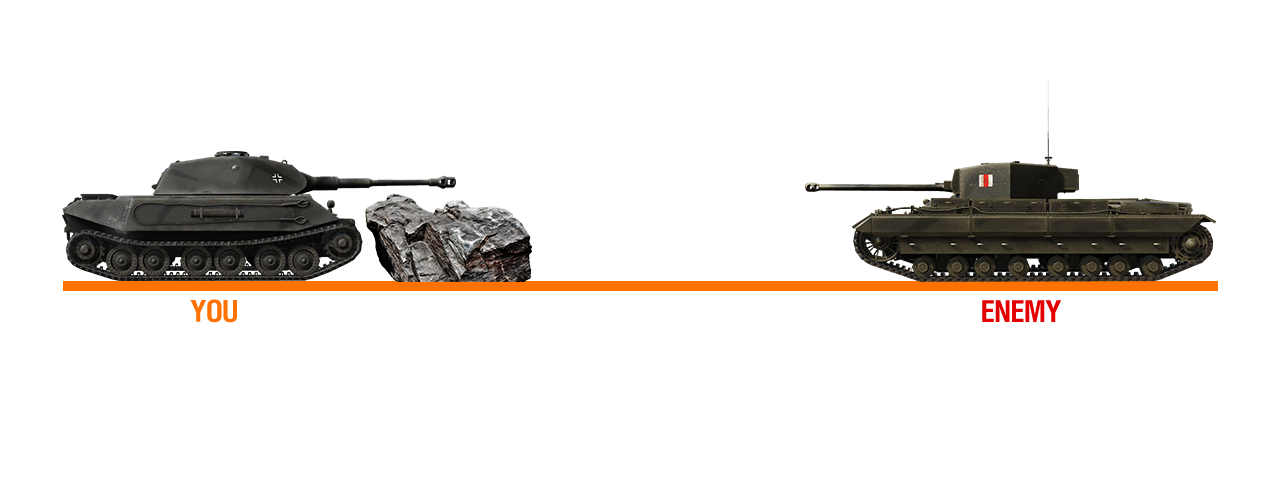
It pretty much depends on the tank. If you’re playing with an IS3, you have a pike-nose, which means the most effective way of bouncing enemy shells is to face them strainght ahead, while hiding your lower plate behind a piece of rubble. If you angle your tank, then depending on which way to angle it, the other side will be more straights, hence the enemy will be able to pen it easier. If you have a german-style tank (which looks like a brick), then you can angle your whole tank because you won’t have to worry about flattening your front, but if you angle it, the effective armor thickness will be better.
Shell usage
Basically you should use AP (base shell type, the cheapest). It has normalization, which means if you hit an enemy at an angle, some of that angling will be reduced so the effective armor of your enemy will be decriesed. If you meet an enemy that you have no possibility to penetrate (or it’s risky with the AP and you have some credits to burn), then you should load the gold shells (that you HAVE TO BUY USING SILVER and NOT GOLD), and usually aim for the flattest part on the tank (HEAT shells don’t have normalization and can bounce off very easily if they hit an angled surface). Of course that does not mean that you should be firing HEAT into the front turret of an IS3, but try to find a place that’s not thick and is angled poorly. High explosive (HE) shells should be only used when firing at targets that have no armor whatsoever (artillery, light tanks with shit armor, or turrets of german paper TDs, such as Rhm. Bt; Scorpion G; Wt Auf Pz. IV; Grille; Toaster; etc.), or you’re in a corridor where you have absolutely no chance of penning the enemy that is behind cover and/or you don’t want to waste your precious gold ammo, so you load HE and fuck up their gun, crew or whatever you can shoot at.
How to hull down
If you have a shitty hull armor, always try to expose as little of your tank as possible. When you have good gun depression (you can point your gun down very well), then go behind hills and fire over it.
A couple more hull down situations:
Where to go on maps
Here’s a brief list of maps, with my tactics. These are for the general setup, as the round advances, the tactics and locations should be adjusted according to the current situation on the map.
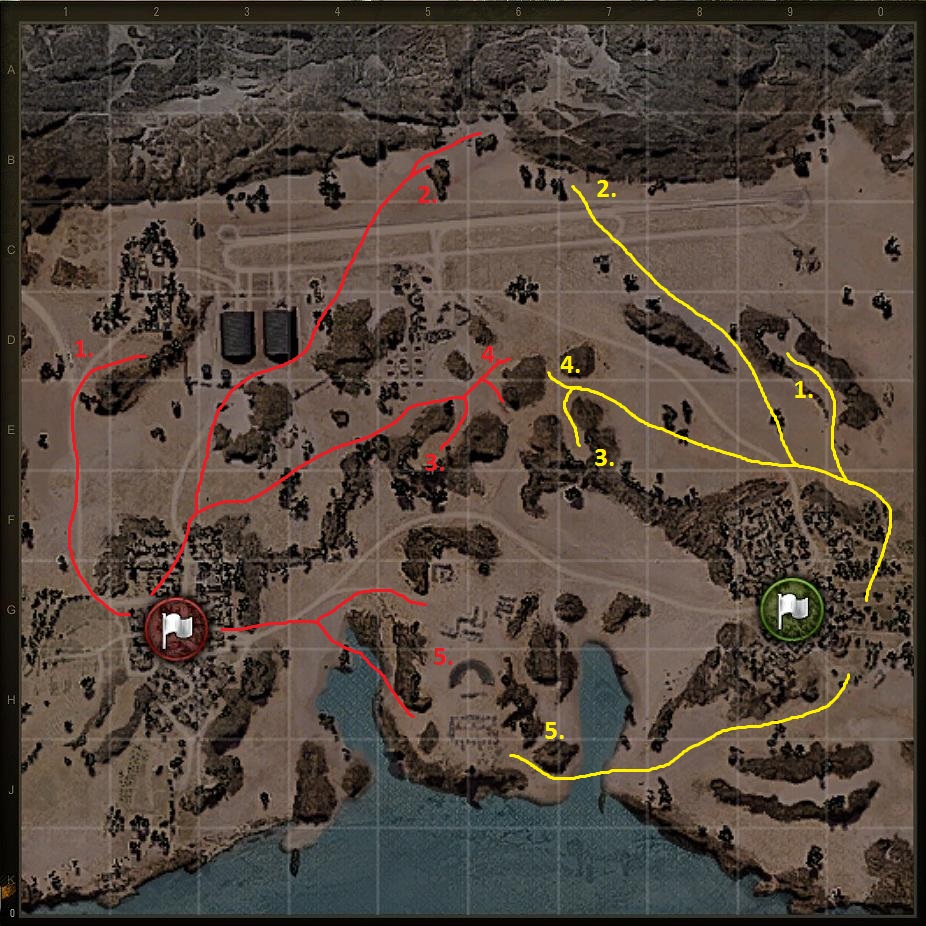
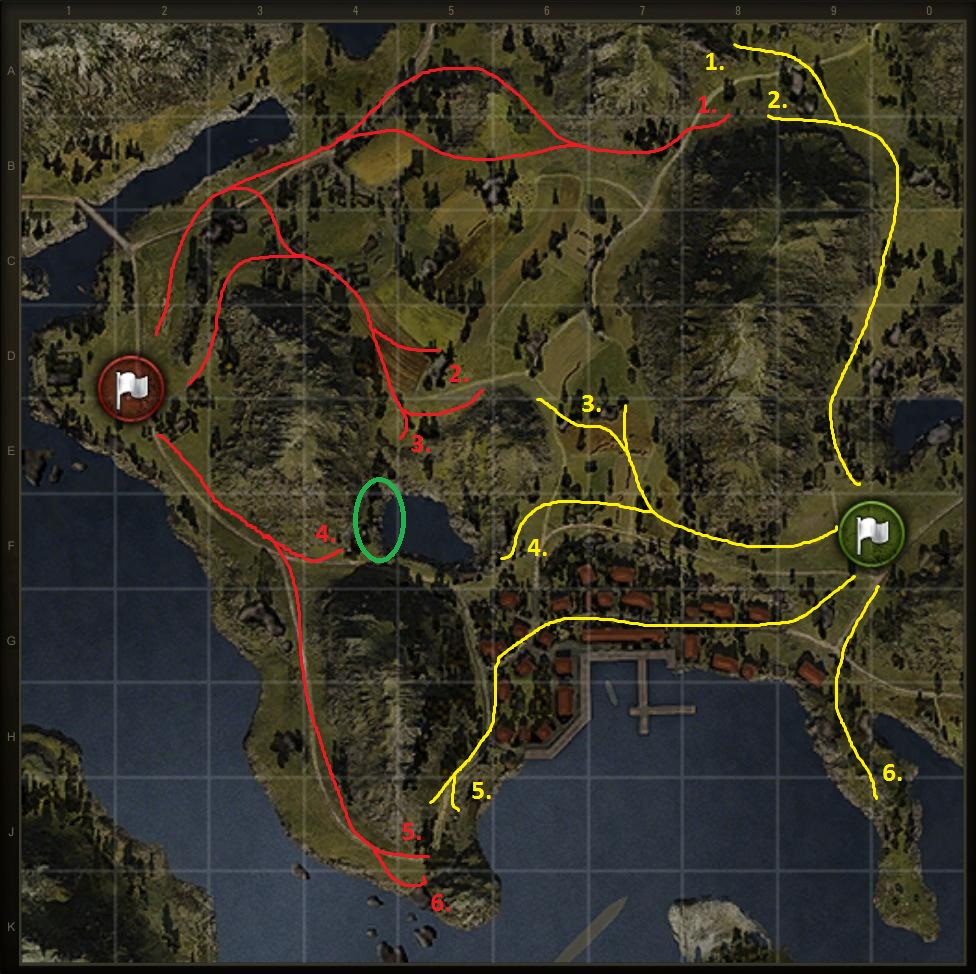
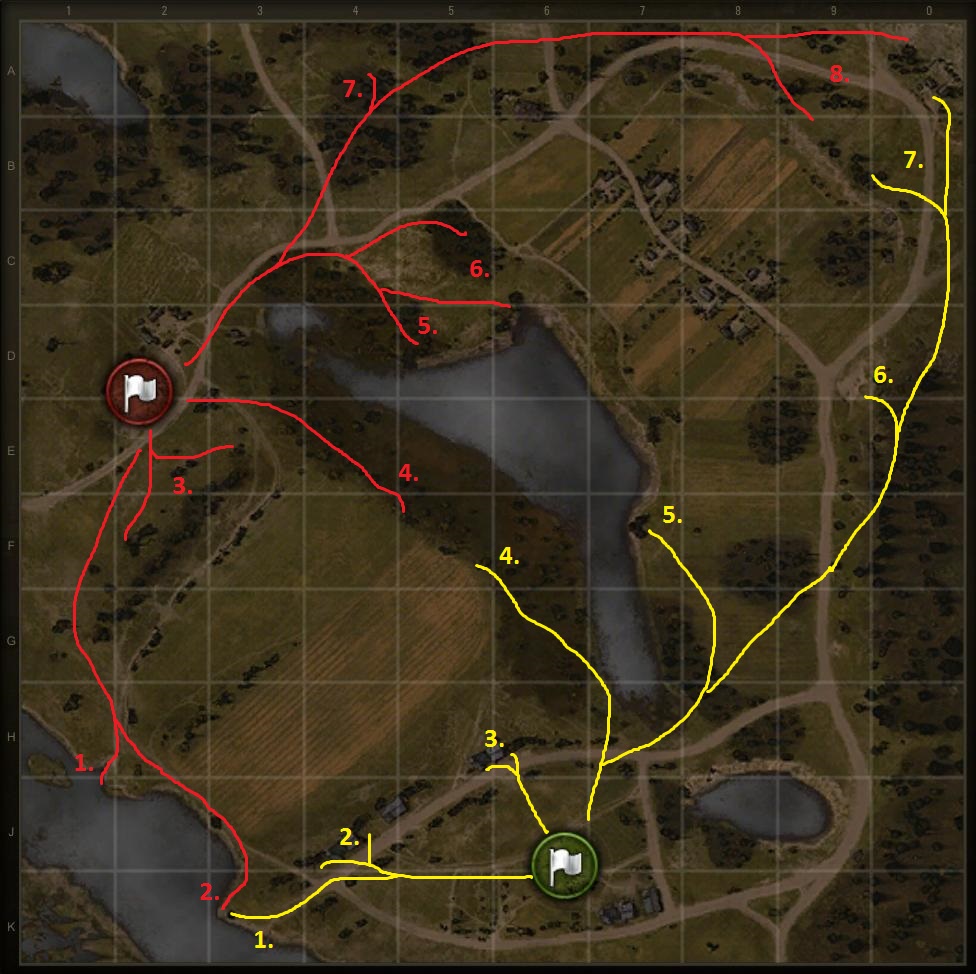
Abbey
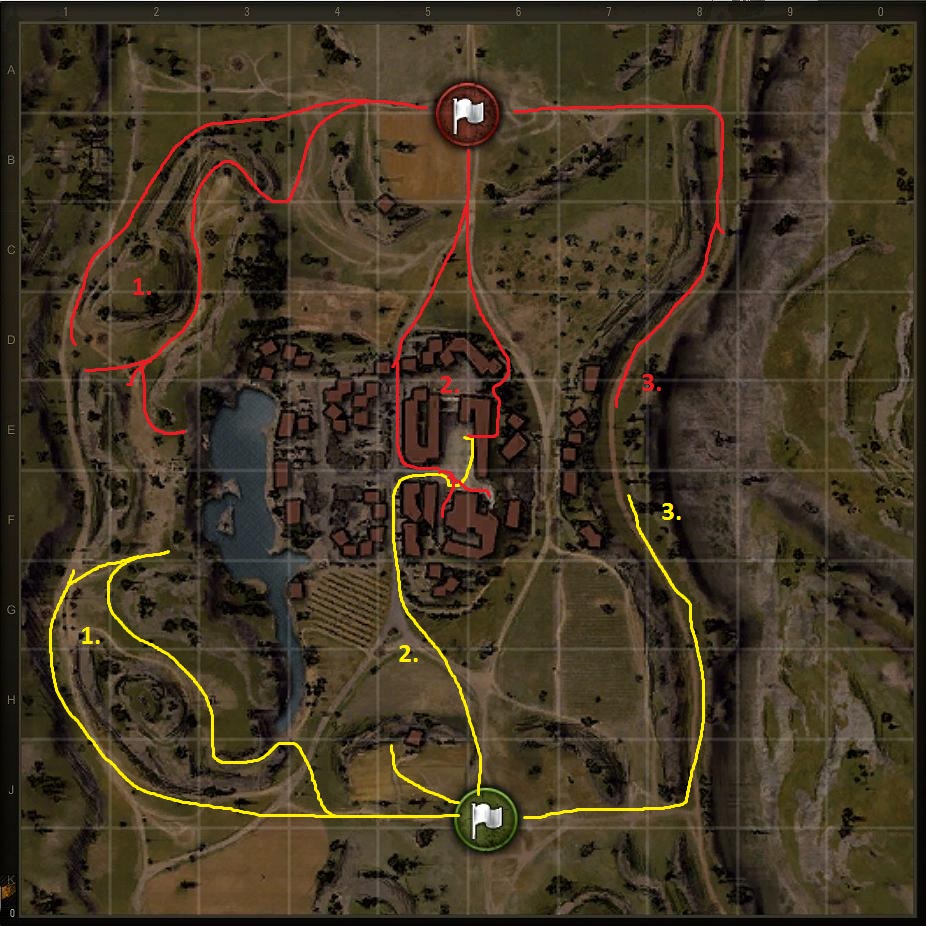
Yellow:
- Medium + heavy tanks are needed there. Heavy tanks should go to the lower lever where they can hide their lower place behind the tank wrecks, while the medium tanks should advance to the upper ground from where they can shoot the enemy tanks coming in from the north, as well providing support fire to the enemy tanks that are moving into the center of the map (church area). Medium tanks on the upper side should look out for enemy artillery fire, as well as being shot from the middle. Heavy tanks can advance on the lower ground if the enemy does not have too many tanks there and flank the medium tanks that are fighting with our own mediums on the upper ground.
- Tank Destroyers can choose to camp at the base for the initial shot at the enemy mediums and lights that are trying to reach the church area. After that they can go to the 1. line, or advance towards the middle. Medium and light tanks can advance to the church area (red 2.) if they feel lucky, or can stay at the entrance to the town and shoot enemy mediums while they try to get to the church. If you’ve managed to get to the church, watch out for enemy tank destroyers at the enemy base, because they have a clear line of fire at you. You can support the other mediums and heavies to the west, by shooting the side of the enemy meds.
- Depending on the enemy team’s composition, heavy tanks or heavy TDs can advance the eastern flank, and put pressure at the enemy base while destroying their artillery if caught unaware.
Red:
- Same as yellow’s, except the light tanks have an alternative and safer route to the church. If medium/light tanks get to the church, they can support both the western and eastern flank.
Airfield
Yellow:
- 1 TD can go there and cover the heavies and meds, by shooting any heavies that try to flank our own heavies from the north, or want to push straight through. It can also support the souther part of the map if the enemies push through.
- Light tank can go there if it’s really fast and spot the enemy tanks that are in the middle. Just be careful and spot occasionally. Once spotted, pull back to cover and wait for the spot to be dropped from you, but don’t instantly go out again to spot, because the enemies like to blindfire there because they know already that you’re there and you want to spot them.
- Fast medium tanks can rush there, and from there they can cover the southern part of the map, as well as shoot the heavies that are trying to flank from the north, and maybe even shoot the enemy light tank at red 2. These meds should be careful because the enemy TDs have a clear line of sight from red 1., and if you poke out your nose to shoot the heavies there, you’ll probably regret it. If the souther part of the map is clear, you can drop down to the south and flank the heavies.
- Heavies should be camping, stopping the enemy heavies from flanking them or pushing through. You can poke to the northern part of the rock, but be very careful when poking the souther part, because enemy TDs and meds are waiting for you to make this mistake. Heavies can push the norther part agressively, but be careful and try to stay in cover from enemy TDs (hangars are great for this).
- Lights, and mediums with good gun depression and/or good turret armor can go here and spot the southern part of the enemy base, but make sure that the enemies are not flanking you on the lower ground, in the sea. You can also support the heavies in the middle, if enemies are pushing through, or shoot at the enemy meds at red 3. If this flank is clear, then you can advance to the enemy base, but be careful because you can no longer go up the slope at the sea, you have to take a detour towards the middle.
Red:
- TDs should camp here and cover the heavies at red 4, by shooting the enemy tanks that try to advance through. Also look out for enemy meds that are poking from yellow 3.
- LT should go here and spot the enemy heavies that are behind the rock, and shoot at the enemy meds that went to yellow 3.
- Fast medium tanks can rush there, and from there they can cover the southern part of the map, as well as shoot the heavies that are trying to flank from the north, and maybe even shoot the enemy light tank at yellow 2. These meds should be careful because the enemy TDs have a clear line of sight from yellow 1., and if you poke out your nose to shoot the heavies there, you’ll probably regret it. If the souther part of the map is clear, you can drop down to the south and flank the heavies.
- Heavies should be camping, stopping the enemy heavies from flanking them or pushing through. You can poke to the northern part of the rock, but be very careful when poking the souther part, because enemy TDs and meds are waiting for you to make this mistake. Heavies can push the norther part agressively, but be careful and try to stay in cover from enemy TDs (there’s a rock in front, push behind it and shoot the heavies in the side).
- Lights, and mediums with good gun depression and/or good turret armor can go here and spot the southern part of the enemy base, but make sure that the enemies are not flanking you on the lower ground, in the sea. You can also support the heavies in the middle, if enemies are pushing through, or shoot at the enemy meds at red 3. If this flank is clear, then you can advance to the enemy base, and eliminate the enemy artillery if there’re any.
Arctic region
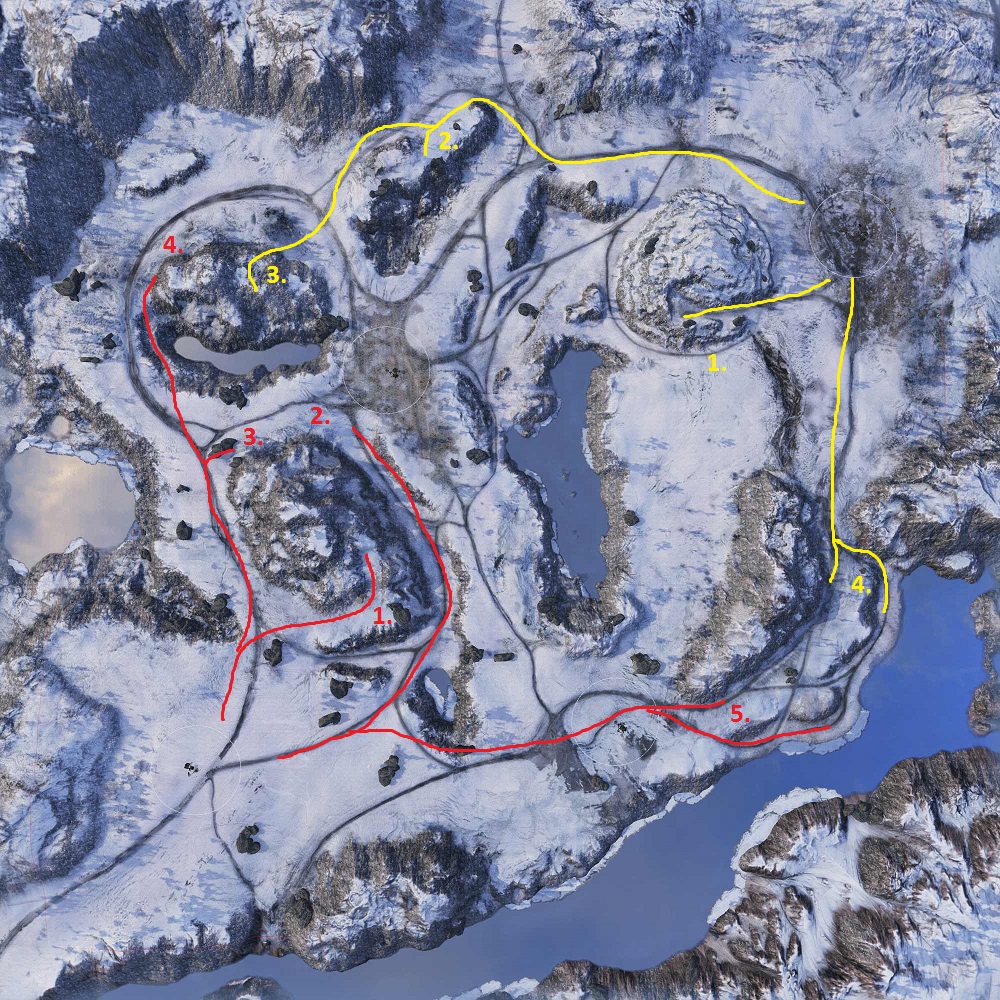
Yellow:
- TD’s place, from here he can shoot enemy TDs that are at red 1, as well as light tanks that are trying to spot from red 2. You can also have some side shots to the side of the enemy heavies advancing towards red 5, if they’re spotted.
- Fast Mediums and light tanks should go here, as well as 1-2 TDs to shoot the light tank at red 2, or heavy tanks that are at red 3, or moving to red 4.
- 1-2 medium/ligh tanks should push here, go on top of the hill and spot any tanks camping at red 2 and 3, as well as shooting tanks that advance forwards from red 4.
- Heavy tanks should go here and be split in half. One half holds the upper level, but stay in cover from artillery, while the tanks on the lower lever push forward and kill the enemy heavies down there and flank the enemy heavies on the upper level. Tanks with good turret armor have an advantage here, because if you manage to push through and flank the enemy heavies, then all they’ll be able to see is your turret, while you’re staying on the ramp.
Red:
- TD’s place, from here he can shoot enemy TDs that are at yellow 1, as well as the light and medium tanks advancing towards yellow 2 and 3, in case you have a spotter tank in red 2. If the enemy heavies push through the south, you can move back a bit and take shots at the enemy heavies.
- Fast LT should go here and spot enemy lights and mediums (or heavies) that are trying to get to yellow 2 and 3. Be careful with the enemy artillery.
- You can stop here with your medium tanks, if you’ve got a spotter at red 2, and take some shots at enemy lights and meds that’re trying to get to yellow 2 and 3.
- Stay here with your meds, and if the enemy doesn’t have a large force there, then advance towards yellow 2, but be careful, check yellow 3 for enemy tanks. Try to get into cover at the bottom of that hill and use your turret to wipe out enemy tanks from yellow 2. After you’re done with that, you can advance into the enemy base.
- Heavy tanks should go here and be split in half. One half holds the upper level, but stay in cover from artillery, while the tanks on the lower lever push forward and kill the enemy heavies down there and flank the enemy heavies on the upper level. Tanks with good turret armor have an advantage here, because if you manage to push through and flank the enemy heavies, then all they’ll be able to see is your turret, while you’re staying on the ramp.
Cliff

Yellow:
- TDs go here and try to shoot enemy TDs at red 1, enemy heavies at red 2, or lights/meds that are trying to quickly get to red 3. As the battle progresses, you can advance to the enemy base.
- TDs and a heavy goes here and shoot at enemy TDs at red 1, heavies at red 2 and meds/lights that want to get to red 3. If everything is clear, these tanks should advance to yellow 3.
- Fast light and medium tanks can get here and get flanking shots into meds and heavies at red 5 and 6, as well as spotting the enemy base and artillery. Be careful, because enemy TDs can shoot you while you’re on the way there, and enemy tanks can have the same idea as you. You also have to look out for enemy tanks at red 4 and 5. Use your turret, because there’s a perfect dip on the way there.
- You can go there with medium and light tanks, and shoot enemy lights as they try to get to the light tower at red 8. Be fast and you won’t be shot in the side from tanks at red 6. If you have nothing alse to shoot, then you can advance to yellow 3.
- Go there with mostly medium tanks, shoot enemy tanks that come up at red 4, and try to get there from red 5, as well as shoot enemy tanks at red 6. Also, while you’re getting there, you can shoot the enemy lights that’re trying to get up to the light tower (red 8).
- You can wedge your tank sideways to the hill so you’ll have good gun depression, and will be able to shoot enemy tanks that go to red 3, 4 and 5. Be careful and don’t get shot from the front.
- Same as 6.
- Light tanks with good gun depression or good viewrange can go up here really quicky, but be careful and don’t get shot in the butt on the way up there. Once you’re up there, you can spot the norther part of the map, and harass any heavy tanks that went to red 9 (in case you have good gun depression or know how to be a mountain goat). Also be careful because enemy light tanks like to get up here as well, and enemy artillery usually zeroes in here as well.
- Heavy tanks should go here and do what heavy tanks do. You can also split them to half and advance on the upper and lower level at the same time. Watch out for chekky light tanks, or even medium tanks from the lighttower, because they like to shoot you from above.
Red:
- TDs go here and try to shoot enemy TDs at yellow 1, enemy heavies at yellow 2, or lights/meds that are trying to quickly get to yellow 3 and 4. As the battle progresses, you can advance to the enemy base.
- TDs and a heavy goes here and shoot at enemy TDs at yellow 1, heavies at yellow 2 and meds/lights that want to get to yellow 3 and 4. If everything is clear, these tanks should advance to red 3, or kill the enemy tanks that got through to yellow 3.
- Fast light and medium tanks can get here and get flanking shots into meds and heavies at red 5 and 6, as well as spotting the enemy base and artillery. Be careful, because enemy TDs can shoot you while you’re on the way there, and enemy tanks can have the same idea as you. You also have to look out for enemy tanks at red 4 and 5. Use your turret, because there’s a perfect dip on the way there.
- If you feel like a sneaky med, then you can go up here as well, but you must have a decent engine power. Even an OI can do it, so you shouldn’t have a problem with it. Once up there, you can push back enemy tanks from yellow 3, and shoot enemy lights going for the lighthouse, as well as tanks at yellow 5 and 6. Once everything is cleared, you can go to red 3.
- You should go there with fast medium tanks, but be careful, don’t be shot in the side by enemy tanks at yellow 5 and those that are on the way to yellow 4. You can also shoot enemy light tanks that are going for the lighttower, and tanks at yellow 5 and 6.
- You should stop the enemy tanks from coming through the middle, as well as shooting enemy heavy tanks that are going to yellow 8. You can also shoot enemy tanks going for yellow 4. You can use mediums and heavies here.
- You can wedge your tank sideways to the hill so you’ll have good gun depression, and will be able to shoot enemy tanks that go to yellow 3, 4 and 5. Be careful and don’t get shot from the front.
- Light tanks with good gun depression or good viewrange can go up here really quicky, but be careful and don’t get shot in the butt on the way up there. Once you’re up there, you can spot the norther part of the map, and harass any heavy tanks that went to red 9 (in case you have good gun depression or know how to be a mountain goat). Also be careful because enemy light tanks like to get up here as well, and enemy artillery usually zeroes in here as well.
- Heavy tanks should go here and do what heavy tanks do. You can also split them to half and advance on the upper and lower level at the same time. Watch out for chekky light tanks, or even medium tanks from the lighttower, because they like to shoot you from above
El Halluf
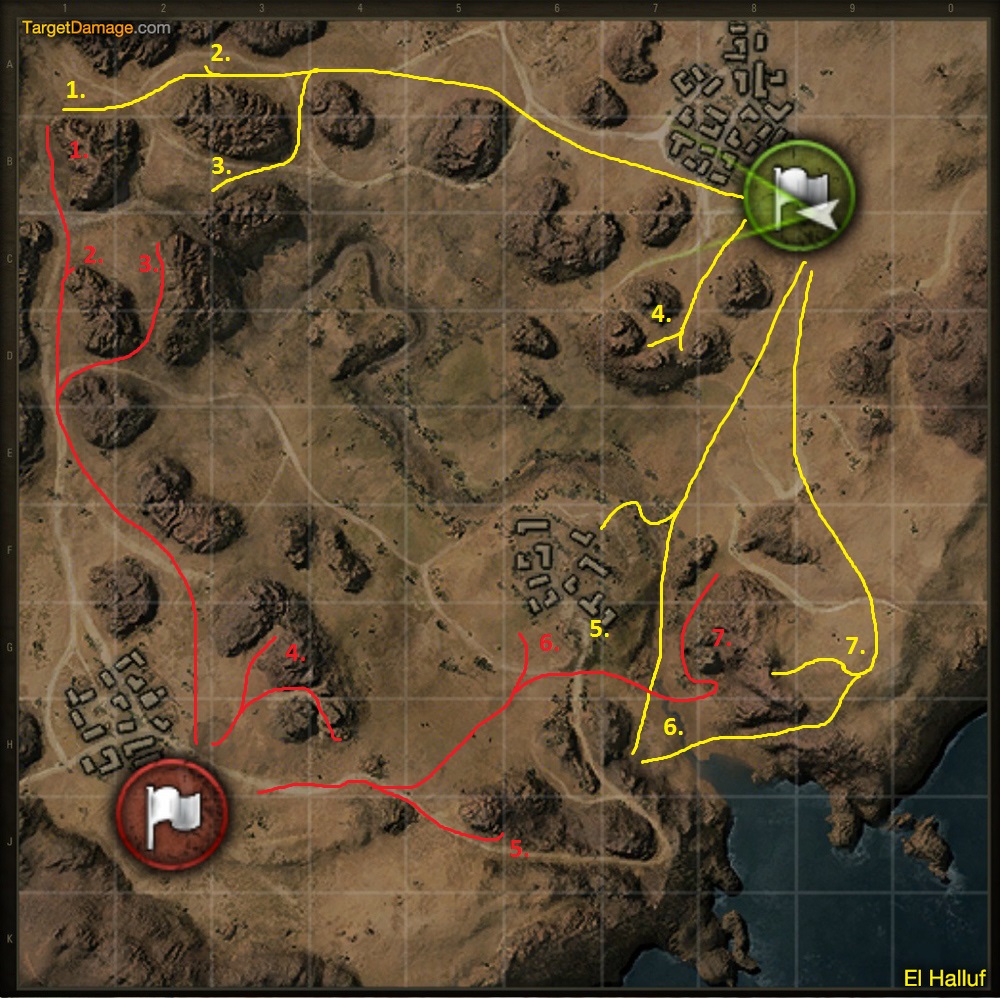
Yellow:
- Heavies should go there, and brawl with enemy heavies at red 1. Be careful because enemies usually camp at red 2 and 3, so only go there if no (or very few) enemy tanks were spotted at red 3 by your teammates at yellow 3. Once you’re there, sidescrape, but be careful and don’t get shot from red 2.
- If the enemies have loads of tanks camping at red 3, then you can stay there and let the mediums at yellow 3 deal with the other meds, before advancing. If the meds are getting pushed back at yellow 3, then head back, and support them, but don’t get shot from red 4.
- Medium tanks should go here with good turret armor and gun depression. Don’t peak out too often and don’t get tracked. You can also get sideshots at enemy heavy tanks moving to red 1. If you’re getting pushed back, fall back to the heavies at yellow 2, or go back to the base. You should spot the enemy tanks at red 3, so tanks at yellow 2 know whether they can go to yellow 1 or not. If the enemy doesn’t have too many tanks at red 3, then you can push in and shoot them, as well as put shots into the butts of enemy heavies at red 1. Also be careful because enemy TDs can shoot you from the enemy base while you’re on top of red 3.
- TDs should go here and shoot enemies that go to red 4, 5, 6 and 7.
- Light tanks should go here. You can either spot from behind the buildings, or you can go to yellow 6 if feeling adventurous. Be careful and don’t get shot by the enemy TDs at red 4, and lights at red 5, and those ones that come down to red 7.
- You can instantly move here with your light tank, or can wait at yellow 7 and if it’s safe, then drop down on the slope. From here on, you can move up into the enemy base, spot the TDs and kill the arties. If there’re many of you, one can be pushed up at the curve as well so he can instantly go for the arties without fighting the TDs at red 4.
- Light tanks should go here and spot enemy lights at red 5, if there’s none, then they can advance a bit forward or go down to yellow 6, and then into the enemy base.
Red:
- Heavies should go there, and brawl with enemy heavies at yellow 1. Be careful because enemies usually camp at yellow 2 and 3, so only go there if no (or very few) enemy tanks were spotted at yellow 3 by your teammates atred 3. Once you’re there, sidescrape, but be careful and don’t get shot from yellow 2. Also, look out for enemy artillery.
- If the enemies have loads of tanks camping at yellow 3, then you can stay there and let the mediums at red 3 deal with the other meds, before advancing. If the meds are getting pushed back at red 3, then head back, and support them, but don’t get shot from yellow 4. Also, you can shoot enemy tanks advancing to yellow 1. If there’re not many tanks in yellow 1 and 2, but plenty of them at yellow 3, then you can flank yellow 3 from the north.
- Medium tanks should go here with good turret armor and gun depression. Don’t peak out too often and don’t get tracked. You can also get sideshots at enemy heavy tanks moving to yellow 1. If you’re getting pushed back, fall back to the heavies at red 2, or go back to the base or some other rocks. You should spot the enemy tanks at yellow 3, so tanks at red 2 know whether they can go to red 1 or not. If the enemy doesn’t have too many tanks at yellow 3, then you can push in and shoot them, as well as put shots into the butts of enemy heavies at yellow 1. Also be careful because enemy TDs can shoot you from the enemy base while you’re at the bottom of yellow 3.
- TDs should go here and shoot enemies that go to yellow 3, 4, 5, 6 and 7.
- A light tank should go here. You can spot enemy lights moving in to yellow 5 and 6, as well as 7. If there aren’t many of them, then you can push down to red 7 and advance towards yellow 7 without getting shot from yellow 4.
- A light tank should go here. You can either spot from behind the buildings, or you can go to red 7 if feeling adventurous. Be careful and don’t get shot by the enemy TDs at yellow 4. You can advance to yellow 7, and behind the ridgeline you can go for the enemy arties, and then shoot the enemy heavies in the butt.
- Comes from red 6.
Ensk

Yellow:
- Heavies and maybe TDs should go here. On the left line you can shoot enemy heavies moving into the left line of red 2. If the enemy doesn’t have many tanks there and you have the advanted in the number and tier of your tanks, then you can advance to the green circle. Be careful and don’t be flanked on the west, and watch out for enemy mediums at red 4. You can push into red 2 carefully, and also kill any tanks at red 3 and flank the tanks at red 2.
- A TD should stay here at the beginning of the match, and shoot any tanks that try to go for red 3. After 2 mins, join the heavies depending on the status of the game, or suppoer the meds at yellow 3 or defend the base on the east.
- 1 medium should go here and spot enemy tanks advancing to the west, as well as shoot enemy mediums that are trying to get to red 4. Once red 4 is clear, you can advance forward, and flank the enemies at red 2.
- Medium tanks and a heavy tank should go here and stop the enemies from advancing, or if there’s few of them, then push in while keeping an eye out for tanks at red 6, and covering the tracks as well.
- Light and medium tanks should go here. You should wait here a bit and support the tanks at yellow 4, and kill any enemy scouts. If yellow 4 is pushing, then clear out red 6, and shoot any tanks at red 5 and in the base.
Red:
- A heavy should go here with good side armor, sidescrape and stop any enemy tanks from flanking the tanks at red 2. If there’s nothing here, you can join the tanks at red 2 or flank the enemies at the green circle.
- Heavy tanks on the left line can shoot enemy heavies at yellow 1, and push into the green circle if there aren’t too many enemy heavies there. They also have to look out for enemy meds from yellow 3. Push into the enemy base and clear yellow 2.
- You can shoot the tanks that are moving to yellow 1, and camping yellow 2. If there’s nothing, then you can go towards red 4, and cover that line, or if the middle is clearn, you can flank the enemy tanks in the green circle.
- 1 medium should go here and spot enemy tanks advancing to the west, as well as shoot enemy mediums that are trying to get to yellow 3. Once yellow 3 is clear, you can advance forward, and flank the enemies in the green circle, or push into the enemy base.
- Medium tanks and a heavy tank should go here and stop the enemies from advancing, or if there’s few of them, then push in while keeping an eye out for tanks at yellow 5, and covering the tracks as well.
- Light and medium tanks should go here. You should wait here a bit and support the tanks at red 5, and kill any enemy scouts. If red 5 is pushing, then clear out yellow 5, kill the arties and shoot any tanks at yellow 4 and in the base.
Fisherman’s Bay
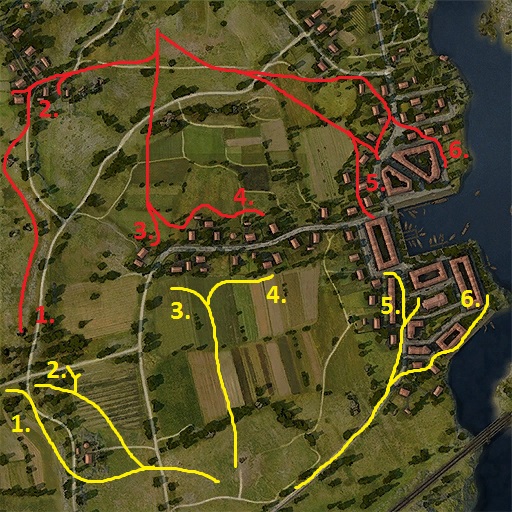
Yellow:
- Medium tanks and TDs should go here and cover the ridgeline from enemy tanks, as well as quickly spotting enemies moving into red 1. Also be careful and stay behind the bushes because enemy TDs like to camp in red 2 and you’ll get shot as soon as you’re spotted.
- Medium tanks should go here, and shoot any enemy tanks moving to red 1, 2 and 3 that are spotted by a scout from yellow 3. Stay behind the trees and take shots without getting spotted. You can also stop enemy tanks from moving into yellow 1. If the enemy is pushing hard, then move back from the road, behind that small hill, and cover your allies in yellow 1.
- A light tank and medium tanks should go here and spot enemies at red 2, 3 and 4. Also try to kill the enemy lights and meds at red 3 and 4.
- Same as yellow 3, but you can take shots at heavy tanks at red 5 as well, so take any opportunities.
- Heavy tanks should move here and cover the bay, and shoot any enemy tanks that try to get through. Try to stay behind multiple lines of cover. Watch out for enemy mediums that try to flank you from yellow 6, because some people like to rush in there and kill you.
- A heavy tank or TD should go here and stop any tanks that came through, as well as shoot enemies at red 6.
Red:
- 1 or 2 medium tanks can rush her (as well light tanks), and stay behind cover while spotting for the TDs at red 2.
- TDs should stay here and cover the mediums at red 1. Stay behind multiple bushes and don’t get spotted, but be able to support your allies if given the chance. You can also shoot enemy tanks that are too cheeky in yellow 3 and 4, so keep an eye out.
- Light tanks should go here and spot any enemies at yellow 2, 3 and 4, but don’t stop, keep moving so you won’t be shot.
- Meds should go here with the primary focus of clearing the tanks from yellow 3 and 4, and then destroying everything on the western line with sideshots, as well as clearing out the enemy base. If enemy heavies are pushing through then you should support the bay.
- A TD and a couple of heavy tanks are needed here to stop the enemies from advancing, and then pushing them back. Some fast medium tanks that are brave enough, can rush through before the enemy heavies would arrive, and flank them at yellow 6. In this case the heavies in red 5 must support them and push in. Be careful because you can be shot in the side by meds at yellow 4.
- Move here with a TD or a heavy, and destroy anything that went to yellow six, and then shoot the advancing tanks from yellow 5, in the side.
Fjords
Yellow:
- A couple of medium and light tanks should go up here, and hold off the enemies. You can go hull down here, and if you have allies in yellow 2, then it’s really hard for the enemies to push through here (unless there’re many of them), because you can shoot them from both sides. Be careful, because enemy TDs may shoot at you.
- Meds with good gun depression and turret armor should go here, and cover their allies in yellow 1, while picking on the enemy tanks at red 1. Be careful for enemy TDs that stopped on their way to red 2, as well as enemy artillery fire. Once red 1 is cleared, the group should be split in two. One goes towards red 2 and clears that out, while the other half goes for the artillery on the way to red 1 (upper line). They should also destroy any TDs in red 2.
- Mediums and light tanks should go here, and try to take shots at tanks in red 2 and 3. If it’s cleared out, then they should help with red 1, and push into the enemy base. Be careful because enemy TDs like to camp behind red 2. You can also take shots from the upper level, at the tanks at red 5 and 6.
- TDs and heavies should go here, and occasionally mediums, if you want to contest the green circle and flank the tanks at red 3. Watch out for enemy heavies and TDs at red 4. If red 4 is clear, then you can push in, clear out red 3, and flank the enemies in red 5 and 6.
- Heavies should go here with good turret armor, stay behind the rock, and hull down in the dip. If the enemies are not pushing, then you can push ut, but be careful. If you have killed everything in red 5 and 6, then you can advance and kill anything at red 4, and head for the base.
- TDs can go here if there aren’t many heavies in the team, and kill anything that comes through yellow 5. You can also support yellow 3 and yellow 2 if enemies push through there.
Red:
- Mediums and lights should go here. Be careful and not be shot from yellow 3. Try to push the yellow 1 and 2 line, but if there’re way too many tanks from there, then fall back a bit and get help from the TDs at red 2.
- Mediums and TDs should go here and destroy any lights in the bushes at yellow 3, as well as stop enemy mads from pushing into red 3. Also provide support for tanks in red 1.
- Medium and light tanks should go here. Watch out for enemy heavies pushing to red 5, and shoot them in the side. Also be careful because enemy meds like to push into the green circle and try to flank.
- Heavies and TDs should go here and shoot anything that goes for yellow 3 and 4.
- Heavies should go here and stop any enemies from advancing.
- Heavies with good turret and gun depression can go here and use the ridgeline to shoot enemy tanks. Once those tanks are killed or fallen back, be careful with advancing, because enemy TDs may be camping at yellow 6. Try to head for cover as fast as you can after waiting for the spot to be dropped. You can also shoot tanks at yellow 3.
Himmelsdorf
Yellow:
- A light tank should go there to spot what’s coming on the left side of the map. If it’s clear, it can advance and kill the arties and TDs at red 2.
- A TD should stay here and kill anything that goes to red 1 and 2.
- A medium tank should go here and spot red 2 for the TD in yellow 2. Watch out because if the hill is lost, you can be shot from the castle. Try to stay in cover. If the left side is clear, then you can advance forward, kill anything in red 2, and have sideshots at tanks in red 3 and 4.
- A medium can go there if there’re enemies in the middle but it’s inadvised.
- Heavy tanks with good turret armor should go here and stop any enemies from advancing. You can advance forward from rubbel pile to rebber pile, while hiding your lower plate and wiggling your turret you the enemies cannot shoot your weakspots. You can also use HE here to destroy enemy modules and crew. Once you’ve pushed through, you can clear the middle and head for the base and church and clear the eastern side of the map.
- Mediums and fast heavies can go here to shoot anything at red 2, as well as kill any enemy tanks at red 4. You can also kill enemies that pushed to the other side of the wall at yellow 8.
- Mediums and some heavies should go here, but be careful, go in the dip so the enemy tanks at red 6 won’t be able to shoot you. Once you’re there, you can poke out and sidescrape and kill anything that’s in red 6, and then slowly shift towards red 5, and 4. If the enemies pushed into yellow 6, help them, this side is cowered by the tanks at yellow 8.
- Go there with tanks that have good turret armor and gun depression. Kill the tanks in red 6 and don’t let tanks from red 5 flank the ones in yellow 7.
Red:
- A light tank should go there to spot what’s coming on the left side of the map. If it’s clear, it can advance and kill the arties and TDs at yellow 2, and then move into the base.
- A TD or a tank with a good turret armor should stay here and kill anything that goes to yellow 2 and 3.
- Heavy tanks with good turret armor should go here and stop any enemies from advancing. You can advance forward from rubbel pile to rebber pile, while hiding your lower plate and wiggling your turret you the enemies cannot shoot your weakspots. You can also use HE here to destroy enemy modules and crew. Once you’ve pushed through, you can clear the middle and head for the base and church and clear the eastern side of the map.
- Mediums and fast heavies can go here to shoot anything at yellow 3, as well as kill any enemy tanks at yellow 6. Try to flank the tanks in yellow 6 and 7, and after you’re down, push down to yellow 8 and then look down at yellow 5 from the gap in the wall.
- Mediums and heavies should go here and carefully peak out and kill the tanks in yellow 7 and 8. If red 4 gets pushed back, then the forces should be split and cover them.
- Tanks with great gun depression and turret armor can stay here and suppoer the tanks in red 5 by killing the enemy tanks at yellow 7 and 8 (or just intimidate them so they won’t peak out).
Karelia
Yellow:
- Light tanks and a few medium tanks can go here and stop the enemy from advancing. If there aren’t many enemies there, you can push to red 1, and then kill anything that’s left at the base.
- A light tank should go here and spot any enemies that are going for red 1 and 2, as well as spotting the enemy light tank that goes to red 3. If it’s clear, you can move forward, and just spot without taking shots and being spotted.
- Adventurous light tanks can go up here, but I do not advise ti because it’s very risky and you can easily be killed in a matter of seconds.
- Lights and medium tanks should go here, while taking shots (on the move) at enemies that are trying to get to red 4, and then kill any enemy tanks that got up to red 3 and 4. After everythign is destroey, and if there’re not tanks spotted in red 2, then they should advance forward and kill any enemies at red 6.
- Heavy tanks with good armor can stay there, and kill any enemies that are late for the party at red 4, and also take shots at red 5. Wait for the meds to clear the upper level, and then advance.
- Heavies with good turret armor and gun depression can go into the dip, advance to the rocks, and then cover the meds in yellow 4, as well as peeking out (sidescraping) and taking shots at red 6. Once red 6 is clear, you can move forward and put pressure on red 5, while keeping an eye out for the enemy base because enemy tanks like to camp there.
Red:
- Light tanks and a few medium tanks can go here and stop the enemy from advancing. If there aren’t many enemies there, you can push to yellow 1, and then kill anything that’s left at the base.
- A light tank should go here and spot any enemies that are going for yellow 1 and 2, as well as spotting the enemy light tank that goes to yellow 3. If it’s clear, you can move forward, and just spot without taking shots and being spotted.
- Adventurous light tanks can go up here, but I do not advise ti because it’s very risky and you can easily be killed in a matter of seconds.
- Lights and medium tanks should go here, while taking shots (on the move) at enemies that are trying to get to yellow 4, and then kill any enemy tanks that got up to yellow 3 and 4. After everythign is destroey, and if there’re not tanks spotted in yellow 2, then they should advance forward and kill any enemies at yellow 6.
- Heavy tanks with good armor can stay there, and kill any enemies that are late for the party at yellow 4, and also take shots at yellow 5. Wait for the meds to clear the upper level, and then advance.
- Heavies with good turret armor and gun depression can go into the dip, advance to the rocks, and then cover the meds in red 4, as well as peeking out (sidescraping) and taking shots at yellow 6. Once red 6 is clear, you can move forward and put pressure on yellow 5, while keeping an eye out for enemy TDs that like to camp back there.
Lakeville
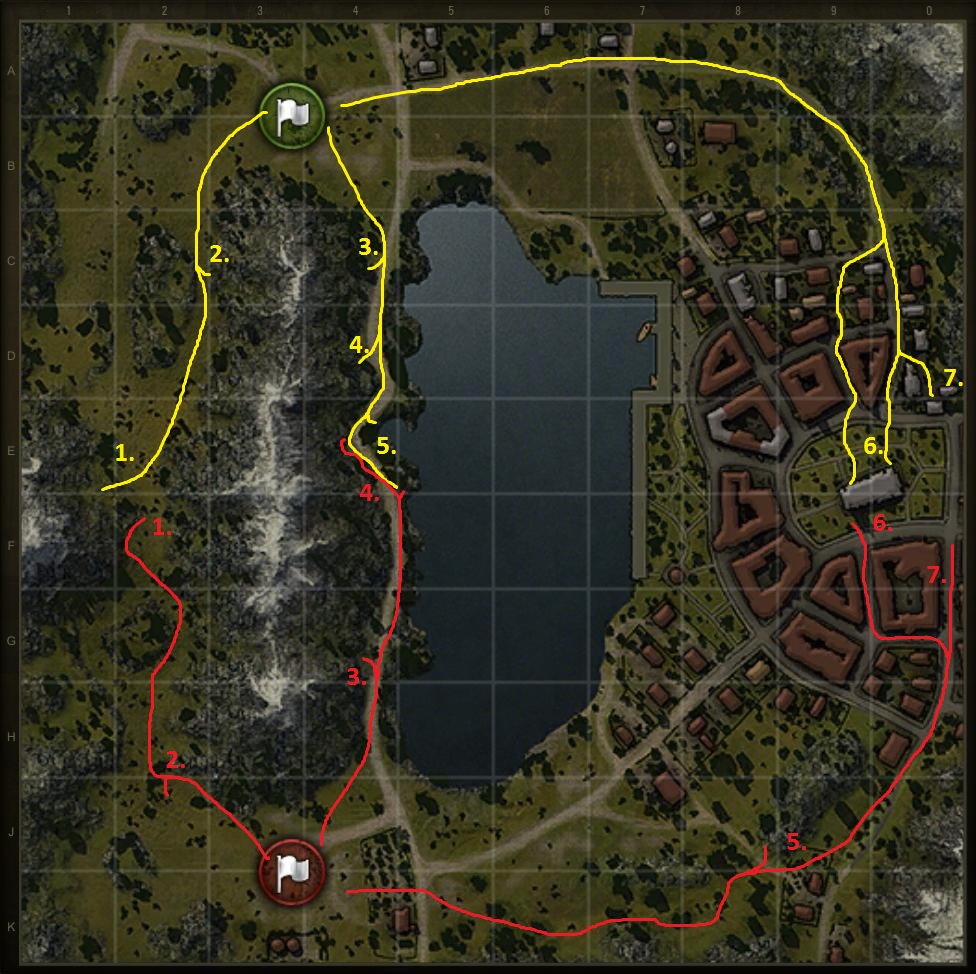
Yellow:
- A light tank should go here and spot what’s coming on that side of the map. If there’re plenty of enemies, but are camping then he can hang around and just spot them. If they are pushing forward, then fall back to the base and ask for assistance by the TDs that are camping in the back, as well as the mediums.
- Meds and TDs should be camping here and wait for the light to spot the flank. If it’s safe to advance, then do so and use the turret armor and gun depression to kill anything at red 2. If the enemies are pushing heavily, then stay in cover and wait for them to peak over the top of the hill. If you cannot hold them off, then you can fall back to the cap circle or the arty place. Also when pushing forward, look out for enemy artillery fire because it’s really easy for them to shoot at you since you’re on soft terrain and are moving and turning slowly.
- Meds should go here and shoot anything that’s being spotted by the ligh tank at yellow 5. After the spots are done, these meds should join the heavies in the town or support the meds and TDs on the west.
- Same as yellow 3.
- A light tank should go here and spot the enemies that are moving to red 5, so the allies can shoot them from yellow 3 and 4. If there’re no enemy lights there, then you can advance forward and do some agressive spotting.
- Heavy tanks should go here, and then be joined by the medium tanks from yellow 3 and 4. Watch out because mediums can shoot you from red 3 if you’re spotted. Brawl with enemy heavy tanks and kill the mediums that came here. Clear the city and advance towards red 5.
- Same as yellow 6, but you should cover the red 7 and if tanks in yellow 6 need help, then join them and push back the enemies.
Red:
- Same as the yellow part, except the ligh tank should go to red 4, while a heavy tank ca stay at red 5 to kill the spotted tanks.
Live Oaks

Yellow:
- Heavy tanks should go here and try to push to red 1, by moving from cover to cover. Be careful when moving there because you can be shot from the side by the enemy heavies.
- Heavy tanks go here as well and shoot the enemy heavies in the side if they try to advance from red 1 to yellow 1. If yellow 1 are advancing then they should flank the red 1 tanks.
- TDs should go here and wait for the light tank in yellow 4 to spot the enemy light tank and TDs in red 3, as well as putting shots into the side of enemy heavies that are heading for the town. Be careful because the enemy light tank can easily spot you.
- A light tank should go down to the dip and spot the enemy TDs that are camping at red 3, so the allied TDs can kill them very quickly. After the enemy TDs are thead, it should spot the enemy base from red 3, and then flank the enemies either in the town or to the east.
- Medium tanks with good turret armor should go here, spot and shoot any enemies that go to red 4 and 5. Look out for enemy artillery fire, always stay in motion. If the enemies not pushing down to yellow 6 (dip), then you can go down there and put flanking fire into the meds that are fighting with the tanks in yellow 7.
- Depending on the composition of the enemy team, medium tanks (or even light tanks) can rush in here and use their gun depression and turret armor to track and kill enemy meds before they could get into the dip.
- Medium tanks with good turret armor and gun depression should go here and harrass enemy meds that went to red 4 and 5, without getting shot by the TDs that are camping at the base.
Red:
- Heavy tanks should go here and try to push to yellow 1, by moving from cover to cover. Be careful when moving there because you can be shot from the side by the enemy heavies. It is inadvised to camp in places where the artillery can hit you easily. Near the water tower, you can stay at the corner of the house, and hide your lower plate behind a staircase. Here, you can shoot any tanks that try to go to yellow 1, but are vulnerable to fire from the camping TDs at yellow 3.
- A light tank should go there and spot any heavies that are going to the town, as well as spotting the TDs that are camping at yellow 3, so the allied TDs can kill them from red 3.
- TDs should be camping here and provide supporting fire to the light tank, and pick out some of the heavies that are going into the town. After everything is clear, they can join the heavies in the town and clear that one out.
- Mediums with good gundepression and turret armor should go here and shoot any tanks that are passing through the railway. Try to spot any tanks that are going to yellow 7, but don’t really peak out, because enemy TDs can camp at the enemy base.
- Same as 4, except they should push back the enemy tanks at yellow 7 without exposing themselves to the ones from yellow 5.
Malinovka
Yellow:
- A medium tank with good turret armor should go here and kill anything that goes to red 1, or any tanks that rush to red 2. It’s always good to track enemy tanks that are trying to rush through, so your teammates can kill it before it gets into cover at red 2.
- TDs should go here and kill anything that is coming towards red 2, as well as any tanks that are spotted at red 3.
- Same as yellow 2 TDs, but they should pay attention to any enemy lights at red 4, and enemy tanks at red 5 and 6. Be careful when camping behind the building, because enemies can shoot through the window and hit you in the side.
- A light tank can go there and spot most of the enemy tanks that are going for the hill, but be careful because once you’re spotted it’s really hard to make it out alive. Under no circumstances should you fire your gun while being in the bush and not spotted.
- Mediums with good gun depression and turret armor should go there and spot any enemies that go to red 5 and 6, or are being spotted by the light tank in yellow 4. They can also put flanking shots into the side of heavies that are going up the hill. If there’s nothing in red 5 and 6, then they can advance to the end of the red line under red 6, and spot the tanks from there.
- Some mediums and TDs can stay here and cover the red 5 and 6 line, as well as providing covering fire in case the heavies from the hill have to fall back because of overwhelming enemy forces.
- Heavy tanks should go here and depending on their gun depression go to the absolute top of the hill, or stay in the dip. It’s good to use the turret armor, or side-scrape at the windmill. Once the heavy tanks are down, they can push down to the church, but watch out for fire from red 6 and 7. Watch out for enemy artillery fire.
Red:
- A medium tank can go here and provide covering fire for any allied tanks that are going for red 2. They can also track enemy tanks that are trying to do the same vice versa.
- If you’re feeling adventurous, you can try to rush there with a fast heavy or a medium with good turret armor and gun depression, or even with a light tank. From there you can spot the whole enemy base, and TDs camping at your base will be able to kill them (mostly).
- TDs usually camp here for the beginning of the match, and wait for spots by tanks going to red 2, 5, 6 and the light tank going to red 4. After there are nothing else to shoot at, they should join the tanks at red 5 and 6, or if the enemies are pushing the hill, then go to red 7 and fire from the magic forest without being spotted.
- A light tank can go there and spot most of the enemy tanks that are going for the hill, but be careful because once you’re spotted it’s really hard to make it out alive. Under no circumstances should you fire your gun while being in the bush and not spotted.
- Mediums with good gun depression and turret armor should go there and spot any enemies that go to yellow 5 and 6, or are being spotted by the light tank in red 4. They can also put flanking shots into the side of heavies that are going up the hill. If there’s nothing in yellow 5 and 6, then they can advance to the end of the red line under yellow 5, and spot the tanks from there. They can also shoot tanks at yellow 3.
- Same as 5, but they can provide support for the hill as well.
- If the enemies are pushing hard on the hill, tanks can go here and shoot the already spotted enemies that are coming down the hill, without being spotted.
- Heavy tanks should go here and depending on their gun depression go to the absolute top of the hill, or stay in the dip. It’s good to use the turret armor, or side-scrape at the windmill. Once the heavy tanks are down, they can push down to the church, but watch out for fire from red 6 and 7. Watch out for enemy artillery fire.
Mines
Yellow:
- A light tank or a medium tank can go here and spot the enemy LT or MT that came here, and can also support the tanks in the middle.
- A medium tank or a TD can stay here and provide covering fire for the tank in yellow 1, or shoot at tank that made their way into red 7 and are spotting the base. It can also support the middle and shoot at the side of tanks going for the middle.
- A medium or heavy tank can stay here and shoot the side of the tanks that go for red 6,7,8 and 9. They can also fire at tanks at red 2.
- If there’s no artillery in the game or you’re not afraid of it, you can stay here (with a heavy tank) and shoot the tanks that are going to the places mentioned above.
- If there’re artillery in the game, then you can instantly go for the rocks in the middle, and shoot the tanks that are gong for red 6-9. Be careful because if they get through, you can be shot in the side from red 6. Try to peak out here and shoot the enemy tanks at red 2,4 and 5. Don’t push out too much, because TDs are likely camping at the base.
- Mediums and lights should be rushing to the hill (if the number of them on both sides are roughly equal. If you have more mediums and lights then the enemy team, then always go for the middle.) Once you’re there, kill any enemies that made it there, and harrass the enemy heavies that are trying to come up.
- Same as 6, but go behind the enemies and use your gun depression to shoot down on them. Also, be careful because the enemy TDs are usually camping at the back of the base, so use the rocks in front of you as cover.
- Same as 6 and 7, but if there’re lots of TDs, then you may want to get the spots dropped off you. You can move back there and wait a bit, and then go back and harass them.