[LINUX] Cleaning up a full boot partition
Rarely, but it can happen that the /boot partition fills up on Linux machines, in which case it’s worth deleting the old kernels, but this isn’t always straightforward.
You can check the disk usage with the following command:
df -h
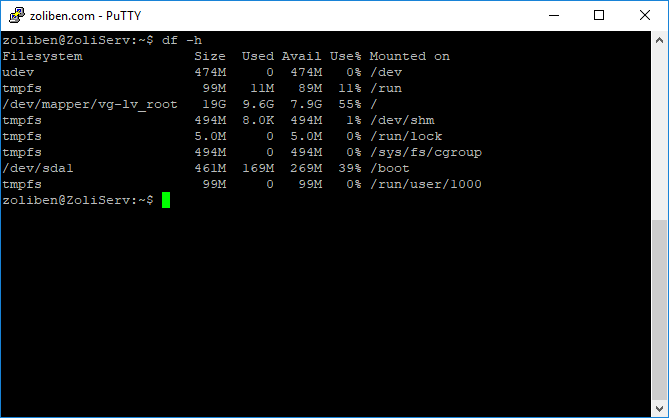
The image shows the state after cleaning, so the /boot partition is now only at 39% usage
In this case, apt-get upgrade gets interrupted during the kernel update, since there’s no more space on the partition. This constantly throws errors, and there are cases (like mine) where updates can’t run at all anymore because previous ones have failed.
You might think to purge the old, unused kernels, but this results in the apt-get purge 4.4.0-1xx-generic command also failing, since the apt package manager first tries to fix the half-installed kernels.
The solution is to manually delete the unused kernel files (it’s very important to be careful and not to delete the current and newer kernels), and then use the dpkg package manager to remove the old kernels one by one.
Let’s check which kernel the system is currently using, and make note of it:
uname -a

The server is currently using the 4.4.0-140-generic Linux kernel.
Let’s go into the /boot folder and list the files:
cd /boot
ls -l
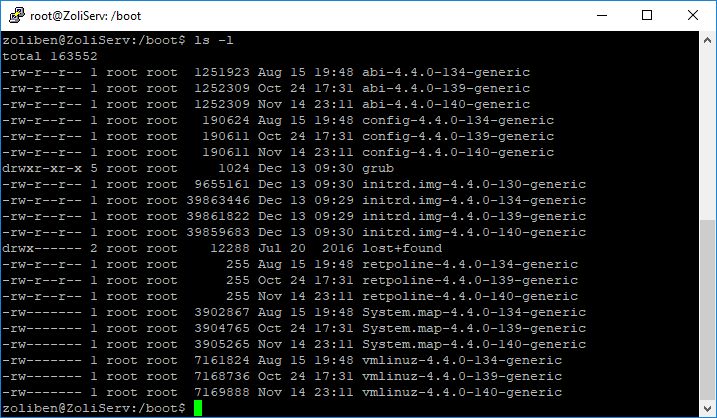
As you can see, each kernel version has 6 different files associated with it.
PROCEED CAREFULLY, DOUBLE-CHECK THAT YOU’RE NOT TYPING SOMETHING WRONG!!!
As you can see, all files for each kernel share the same suffix, so you can simplify, but only carefully! Never delete the currently used kernel or any newer ones!
sudo rm -rf *4.4.0-134-generic *4.4.0-139-generic
This deletes the files for the 134 and 139 kernels, freeing up some space (usually there are many more old kernels), and we can proceed.
List the old kernels:
sudo dpkg --list 'linux-image*'|awk '{ if ($1=="ii") print $2}'|grep -v `uname -r`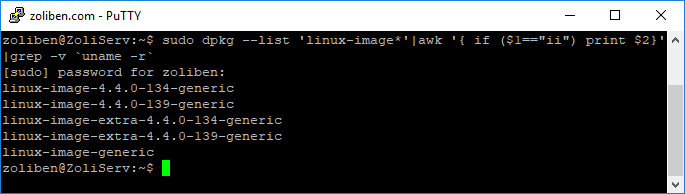
As you can see, the system still considers the old kernels as installed, even though the files are no longer in place.
If you were to run apt-get purge ‘linuxkernel’ now, it would first try to fix the errors, thus re-downloading and attempting to install them, which would immediately fill up the partition again.
Use the DPKG package manager and manually remove the kernel packages one by one:
sudo dpkg --remove linux-image-4.4.0-134-generic
Once you’ve removed all unnecessary kernel packages, run the following to fix the previously incomplete installations:
sudo apt-get install -f
Let the installations/updates complete, then remove the no longer needed packages:
sudo apt-get autoremove
After that, check the /boot partition usage:
df -h
If everything went well, there’s nothing more to do.